It’s been a long and difficult journey to the perfect biscuit (cue the tiny violin) but SOMEBODY had to do it!! And let me assure you.. I’ve done it: I’ve cracked the code for the perfect biscuit with the layers of flaky, buttery goodness you crave!
Looking back, I can’t really remember when exactly my obsession with perfecting the biscuit started but it’s definitely been an affliction for the better part of this year. I poured over multiple cookbooks and online recipes and was actually pretty amazed at how many different versions there were. I also did some nerdy studying up on the science behind the fats, gluten creation, what happens when you do… etc… (don’t judge). Some recipes included buttermilk, some used only butter, some used only crisco – and all of them claimed to be the best!! Which is ironically what I’m doing now… but trust me– make these once and they will keep you coming back for more over and over again!!

Biscuits probably seem a bit intimidating if you aren’t very confident in the kitchen but TRUST ME- you can do this! Working with dough is overwhelming and I’ll admit: even I have shed tears over a pie crust here and there. But the amazing thing about biscuits are- you’re not rolling the dough out and you’re not trying to transfer it in perfect shape anywhere (like the dreaded pie crust) you are really just having FUN with the dough and if they don’t come out in the perfect shape.. who cares?? Call them “rustic” and when you taste them it won’t matter!!

My recipe is easy enough for the less confident baker but you will SERIOUSLY impress your guests when you pull these out of the oven and they’ll think you slaved away over them- it will be our little secret 😉
The dough also freezes REALLY well. Once you cut the biscuits you can stop there and freeze them and place them in a plastic bag in the freezer to bake off another time. They’ll stay good for about 3 months in your freezer but I have a feeling they won’t last that long! If you bake them frozen, increase the oven temp to 425 OR cook them a bit longer until golden.
Let’s get started!
Breakfast Biscuits
yield: 14 biscuits – prep time: 15-20 minutes – bake time: 16 minutes
INGREDIENTS
4 cups of all purpose flour
6-8 tbsp white sugar
2 tsp salt
6 tbsp baking powder
14 tbsp cold butter (just under 2 sticks)
1/2 cup cold crisco
2 cups of cold milk
1 egg + milk for egg wash
Step One: Preheat your oven to 400 degrees.
Put all your dry ingredients together in a bowl and mix until combined: flour, sugar, salt, baking powder.
Step Two: Cut in the butter in small pieces like this:

Step Three: Measure 1/2 cup of cold crisco and throw that it too:

Do you remember why it’s important to use cold fat? Because when cold fat goes into a hot oven it melts and creates the wonderful pockets of air making your biscuits flaky and tender!
Step Four: Using a pastry cutter, two forks or YOUR HANDS (yup!) mix the fat into the dry ingredients until it’s fully incorporated and the fat is roughly the size of peas:

You could also do this in a food processor but… but… don’t? OK I mean you caaaaaannnnn but….I’m kind of a snob when it comes to certain tools and I love getting in there to work with the dough myself- it feels more authentic and fun and that IS how Grandma did it after all!! I actually was SUPER reluctant to buy a pastry cutter and used my hands for months before giving in and buying this one and it was totally worth it!! You can also find them at a Homegoods or TJs/Marshalls for around 5 dollars.
Step Five: Pour in the milk and mix with a wooden spoon JUST until it starts to come together. Gluten starts to develop when you mix your wet and dry ingredients together and a lot of gluten is not something you want building up in your biscuits because it will make them dense and tough- no thank you!

Step Six: Turn your dough out onto a floured surface:
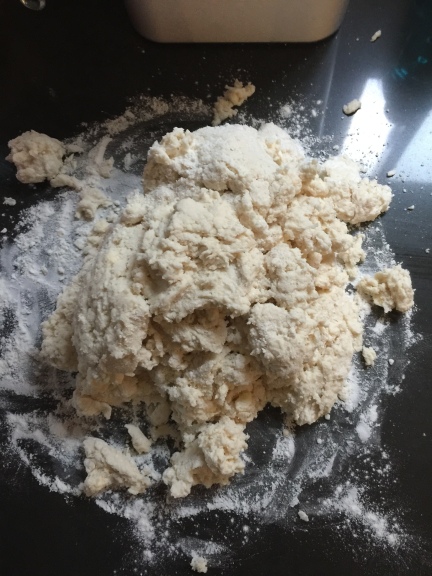
Step Seven: Gently kneed the dough (remember- we don’t want to work it too hard and make too much gluten!!)
OK pause for a moment and watch this hilarious clip regarding gluten- God Bless Jimmy Kimmel
Continue to fold the dough over on itself a few times to start building those delicious layers. Keep checking to make sure it’s not sticking to your surface, but if it is, no worries! This isn’t pie crust, remember? So you can just scrape it up, put some more flour down and move on- easy! Eventually you want to get the dough into a thick round circle like this:

The circle does not need to be big enough to cut all 14 biscuits at once, I usually get through 8 and then have to take the scraps, knead them together and begin cutting again. When it doubt, go smaller because you want these biscuits to be thick!
Step Eight: Start to cut your biscuits. You can use an actual biscuit cutter but if you don’t have one a cup will do. You do want something with a sharp edge though, because a rounded edge will pinch off the sides of the biscuit and they won’t rise as high. Additionally, don’t twist your cutter, this also pinches the edges, just cut down and pull back up!

Step Nine: Take your biscuits and lay them on a greased or parchment lined baking sheet. You could also use a cast iron skillet! I like to put an egg and milk wash brushed over the top before baking- it adds a gorgeous golden color and they look just beautiful!
To make the egg wash, simply whisk an egg with a little bit of milk and then brush on top.

Step Ten: Bake for 16 minutes, remove when done and serve immediately but they do heat up nice as well.
ENJOY! Comment below if you’ve tried them! 🙂


YUM! I will take a dozen to go please! I wish.
LikeLiked by 1 person
Haha! Order up! 🙂
LikeLike